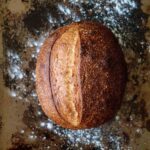
Basic Sourdough Bread Without Dutch Oven
Want to bake delicious and easy sourdough bread in your own kitchen? This foolproof sourdough recipe was made for beginners and will give you a simple but delicious sourdough bread without using a Dutch oven.
Servings: 12 slices
Calories: 124kcal
Equipment
- 2 baking sheets
- Parchment paper
- spray bottle
Ingredients
- ½ cup sourdough starter
- 1 cup water
- 3 cups bread flour
- 1 ¼ teaspoon sea salt
- 1 ½ teaspoon sugar
Instructions
- Feed your sourdough starter: Feed your sourdough starter 6 to 12 hours prior to making the dough. The starter should be at its peak activity when you use it, meaning it should have doubled in size and have visible bubbles.
- Mix the dough: In a large bowl, combine the sugar, salt, flour, sourdough starter, and water. Mix only until the dough is formed. It’s okay if the dough is slightly shaggy at this stage.
- Rest the dough for 30 minutes: Cover the bowl with plastic wrap, reusable beeswax wrap, or a damp towel. Let the dough rest in a warm spot for 30 minutes. This rest period helps the flour absorb water, making the dough easier to work with.
- Stretch and fold: After 30 minutes, begin the stretch and fold process. Reach under one side of the dough and pull it up, then fold it over itself. Rotate the bowl ¼ turn and repeat the stretch and fold. After each set, cover the bowl and let the dough rest for 30 minutes. Repeat the stretch and fold 4 to 6 times, with 30-minute intervals, until the dough is soft, less sticky, stretchy, and shows a good windowpane when stretched (meaning it doesn’t tear easily).
- Bulk fermentation: After completing the stretch and folds, let the dough rest at room temperature for bulk fermentation. The dough should rise, almost double and become airy and smooth. This might take between 5 to 10 hours, depending on the temperature of your kitchen (*check note for cold fermentation).
- Prepare the baking pan: Line a baking sheet with parchment paper and lightly flour it with bread flour or cornmeal to prevent sticking.
- Shape the dough: Do not punch down the dough. Instead, place the dough on a clean surface. Gently pull the edge closest to you up and fold it towards the middle. Repeat this process with each edge, folding the dough until it’s tight and shaped into a round or oval loaf. There’s no need for a proofing basket—just shape the dough and place it on the prepared baking sheet.
- Proof the shaped dough: Let the dough proof on the lined baking sheet for about 1 and a half hours. After this time, lightly poke the dough with your finger. If the dough slowly springs back and leaves a slight indentation, it’s ready to be baked. If it springs back quickly, let it proof for longer. Avoid overproofing, as this can cause the loaf to lose its structure.
- Preheat your oven: Preheat your oven to its maximum temperature (475/500°F) for at least 40 minutes. Place an empty baking sheet on the bottom rack of the oven during the preheating process.
- Score the dough: Once the dough is ready and the oven is preheated, score the top with a sharp blade, razor, or knife. You can make one long cut across the top, or score in a pattern of your choice. This helps the bread expand during baking. Spray the dough lightly with water to create steam during baking.
- Bake the bread: Carefully pour 1 cup of water into the preheated baking sheet on the bottom rack of your oven just before placing the loaf on the middle rack. Lower the oven temperature to 425°F. Bake the loaf for 40 to 50 minutes, or until the crust is golden brown and you hear a hollow sound when you knock on the bottom of the loaf.
- Cool the bread: Once the bread is done, remove it from the oven and let it cool on a wire rack for at least 1 hour before slicing. This allows the crumb to set and prevents it from being gummy.
Video
Notes
Cold fermentation: For overnight cold fermentation, let the dough rise until it’s about halfway to double its size before transferring it to the fridge. For this step, I recommend covering the dough with plastic wrap or reusable beeswax wrap. Using a damp towel in the refrigerator often leads to the dough forming a skin.
Starter Readiness: Ensure your starter is at its peak activity (doubles in size, bubbly) before using. If it’s too young (under 2 weeks), it may not have enough power to rise the dough properly.
Temperature Considerations:
-
- For best results, ferment the dough in a warm, draft-free location (around 70°F to 75°F).
- If it’s too cold, fermentation will slow down, and the dough may need longer to rise.
-
-
- When testing if your dough is proofed, do the "poke test" gently. If it springs back too quickly, it’s underproofed. If it doesn’t spring back at all, it’s overproofed. A slight indentation means it’s ready.
- Avoid overproofing, which can happen in warmer environments. This could result in a flat, runny dough.
-
-
- Dense Loaf: This could be caused by underproofing or using an inactive starter. Be sure your starter is strong and that your dough has proofed fully before baking.
- Overproofed Loaf: This happens when the dough is left to rise too long. If overproofed, your loaf may spread out too much and not rise properly in the oven. You can still bake it and use it for croutons.
Nutrition
Serving: 1slice | Calories: 124kcal | Carbohydrates: 25g | Protein: 4g | Fat: 1g | Saturated Fat: 0.1g | Polyunsaturated Fat: 0.2g | Monounsaturated Fat: 0.04g | Sodium: 244mg | Potassium: 31mg | Fiber: 1g | Sugar: 0.1g | Vitamin A: 26IU | Calcium: 5mg | Iron: 0.4mg
